DTF printing guide offers a clear path for creators to achieve vibrant, durable transfers on a wide range of fabrics. This guide covers DTF printing techniques, essential DTF materials, and practical DTF troubleshooting steps to help beginners and pros alike. You’ll learn how DTF printing works, what makes a good powder, and how to optimize color fidelity for cotton, blends, or synthetic fabrics. Comparisons like DTF vs DTG are covered to help you decide when this method is the right choice for short runs and custom designs. By following a streamlined workflow and quality checks, you can reduce waste, save time, and produce consistent results.
Beyond the term DTF, this approach can be described as a direct-to-film workflow that starts with printing a design onto a PET film. The process resembles a film-based transfer where color layers and a white underbase are applied before heat, enabling vibrant results on many fabric types. Using alternative language, designers talk about the garment transfer method, adhesive powder, and heat-press steps that yield durable finishes without the need for screens. LSI-friendly terms such as digital fabric transfer, pigment-on-film printing, and adhesive-coated sheet workflows help keep related searches connected to your content.
DTF printing guide: Core Concepts for Beginners
A DTF printing guide acts as a structured pathway from idea to finished garment, helping beginners and pros alike master the essentials: techniques, materials, and quality control. By outlining a clear workflow and practical checklists, you can approach each job with confidence and reduce waste.
In this guide, you’ll encounter terms like how DTF printing works, DTF materials, DTF troubleshooting, and comparisons such as DTF vs DTG. Understanding these concepts early on will help you select the right tools and strategies for different fabrics and color designs.
DTF Techniques: From Design to Final Transfer
DTF printing techniques encompass design prep, color management, white underbase decisions, powder application, curing, and the final transfer. A well-chosen sequence helps preserve detail and color depth, while accommodating a range of fabrics.
Practitioners often experiment with resolution, ink density, and the number of white passes to balance opacity on dark fabrics with hand feel on light fabrics. Mastery of these techniques reduces misalignment and ghosting during the transfer process.
Choosing the Right DTF Materials for Consistent Results
A successful DTF project begins with the right materials. Core components include films, powders, inks, and transfer handling supplies.
When selecting DTF materials, evaluate film quality, ink compatibility, powder particle size, and the reliability of the heat press. Substrate compatibility and pre-treatment also influence the final image, so testing on a sample is essential.
DTF Troubleshooting: Common Issues and Fixes
Even the best workflows encounter problems. Common issues include faint colors, white underbase coverage gaps, and powder adhesion troubles that can lead to imperfect transfers.
Practical fixes involve calibrating ink density, ensuring proper curing, validating the adhesive powder, and confirming print alignment during the pressing stage. For ongoing DTF troubleshooting, keeping logs and performing wash tests helps pinpoint root causes.
How DTF Printing Works: The Core Process Demystified
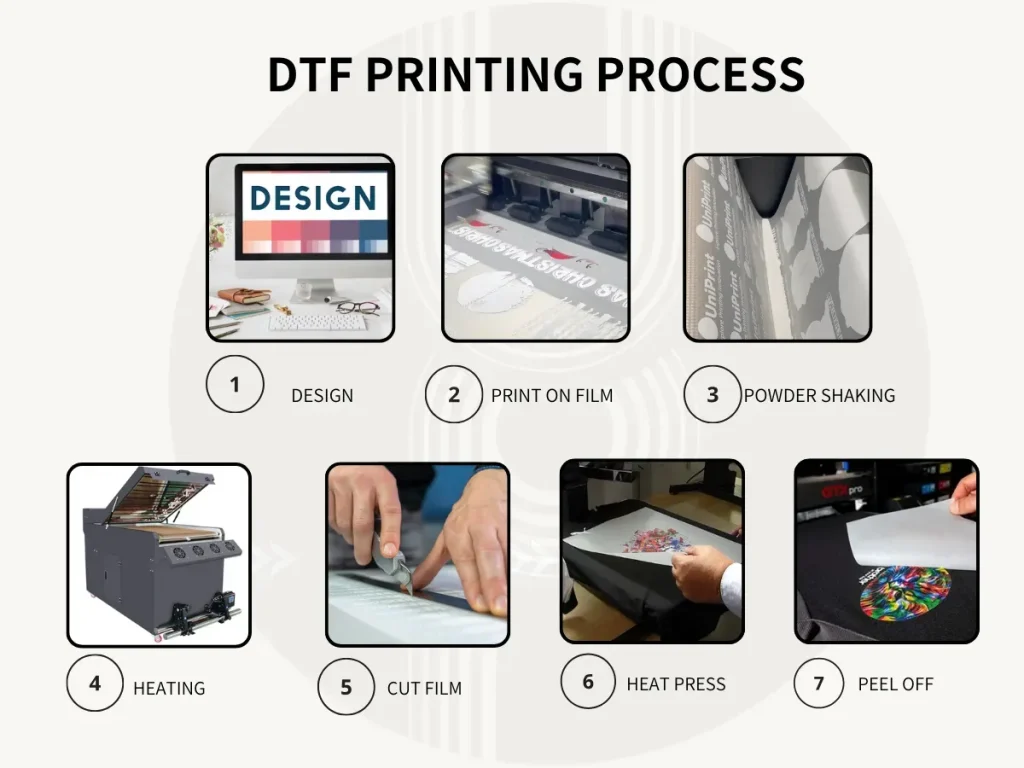
DTF printing works by printing designs onto PET film with pigment inks, using a white underbase when needed to preserve opacity on dark fabrics, before transferring the image to fabric with heat-activated adhesive powder.
A typical workflow includes design prep, film printing, powdering, curing, and pressing. Understanding each step helps you optimize color fidelity, adhesion, and hand feel across a wide range of fabrics.
DTF vs DTG: Choosing the Best Method for Your Garments
DTF and DTG offer different advantages. DTF usually delivers stronger color opacity on dark fabrics and is more forgiving with blends, while DTG prints directly on fabric but may require different pre-treatments.
Screen printing and sublimation present additional options, but for small runs and varied fabrics, DTF tends to be more versatile and cost-effective. Your choice depends on run size, fabric type, desired finish, and turnaround requirements.
Frequently Asked Questions
How does the DTF printing guide explain how DTF printing works and why is it useful for beginners?
The DTF printing guide explains direct-to-film printing: designs are printed onto PET film using pigment inks with a white underbase for dark fabrics, then transferred to fabric with adhesive powder and heat. This step-by-step workflow helps beginners understand each stage—from design prep to final pressing—so you can achieve vibrant colors on a wide range of fabrics with a cost-effective short-run process.
What DTF printing techniques are highlighted in the DTF printing guide for achieving vibrant, durable transfers?
The guide emphasizes techniques such as high-resolution design prep, proper color management, white underbase layering on dark fabrics, correct powdering and curing, and careful temperature and pressure during transfer. Following these DTF printing techniques helps maximize color fidelity and transfer durability.
Which DTF materials are essential according to the DTF printing guide, and how should you choose them?
Essential materials include DTF film transfer sheets, pigment inks, white underbase ink, adhesive powder, curing equipment, and finishing supplies like a heat press. Choose based on film quality, ink compatibility, powder quality, reliable heat press performance, and substrate compatibility; test on samples before full production.
What common issues does the DTF troubleshooting section of the DTF printing guide cover, and how can you fix them?
Common issues include faint colors, white underbase not fully covering dark fabrics, powder adhesion problems, misalignment, peeling after washing, and cracking. Fixes involve adjusting ink density, ensuring proper underbase coverage, correct curing temperature and time, choosing the right powder, and verifying press parameters.
How does the DTF printing guide compare DTF vs DTG, and when should you choose DTF over DTG?
The guide compares DTF and DTG by noting that DTF prints on film and transfers to fabric, usually offering better opacity on dark fabrics and improved wash durability. DTF can be more forgiving with blends and textures and is often preferred for small runs, diverse fabrics, and faster turnaround on non-traditional substrates.
What workflow steps in the DTF printing guide help improve color fidelity and reduce waste?
The guide outlines a workflow from design and prepress to printing, powdering, curing, transfer and pressing, followed by quality checks and post-press care. It also recommends standardized tests, equipment calibration, batch processing, environmental control, and keeping logs to improve color fidelity and minimize waste.
| Topic | Key Points |
|---|---|
| What is DTF printing guide? |
|
| DTF Printing vs Other Methods |
|
| Key Materials for DTF Printing |
|
| Choosing the Right Materials |
|
| Techniques and Workflow |
|
| Common Mistakes and Troubleshooting |
|
| Tips for Consistency and Efficiency |
|
| Advanced Considerations and Best Practices |
|