DIY DTF Transfers are becoming a game-changer in the world of custom apparel printing, providing a simple yet effective way to create stunning designs on fabric. This innovative method, known as direct-to-film transfers, allows enthusiasts and beginners alike to achieve professional-quality results without the need for costly equipment or experience. In this guide, we will explore the essentials of DTF printing, detailing how to create DTF transfers that are vibrant and durable. With just a few materials and some creativity, anyone can produce unique garments that showcase their style. Dive into the fascinating realm of DTF printing for beginners and learn how to revolutionize your fabric creations!
In the realm of fabric design, Do-It-Yourself (DIY) direct-to-film applications have transformed how creative individuals approach custom apparel projects. Known interchangeably as DTF printing, this technique utilizes specialized film to successfully transfer intricate designs onto various clothing materials. By learning how to create direct-to-film transfers, you can unlock the potential for endless artistic expression and personalization in your wardrobe. Suitable for both novice creators and seasoned professionals, this accessible method enables anyone to enjoy high-quality prints right from their home workspace. Get ready to embark on a crafting adventure, exploring the exciting possibilities of custom apparel printing through DIY DTF transfers!
Understanding DTF Printing: An Overview
DTF printing, or direct-to-film printing, is an innovative method of fabric printing that allows artists and businesses to create high-quality designs with incredible detail and color accuracy. This technique utilizes a specialized printer that prints onto a film, which is then processed with adhesive powder to ensure the design adheres properly to various fabric types. The ability to print vibrant designs that can be transferred onto cotton, polyester, or blends makes DTF printing a versatile and popular choice for custom apparel printing.
In contrast to other printing methods such as DTG (direct-to-garment) or screen printing, DTF printing stands out because it offers better handling of complex designs and allows for a quicker production process. Not only does it save time, but it also enables more flexibility in terms of design sizes and colors. This ease of use and adaptability is especially attractive to beginners looking to delve into the world of custom apparel.
Materials Required for DIY DTF Transfers
To successfully create DIY DTF transfers, you’ll need a specific set of materials that are crucial for ensuring quality results. Firstly, a DTF printer is essential as it is designed to handle the specialized inks that are used for this process. Oil-based inks are preferred for their vibrant color output and durability on fabric. Additionally, high-quality DTF transfer film is a necessity, as it serves as the medium on which your design will be printed and transferred.
Other vital components include adhesive powder, which bonds the print to the fabric during the transfer process, and a reliable heat press. The heat press is pivotal as it applies the necessary heat and pressure needed to activate the adhesive and properly transfer the design. Finally, a good graphic design software to create and manipulate your artworks, alongside cotton or polyester garments, rounds out the list of required materials for a successful DTF transfer project.
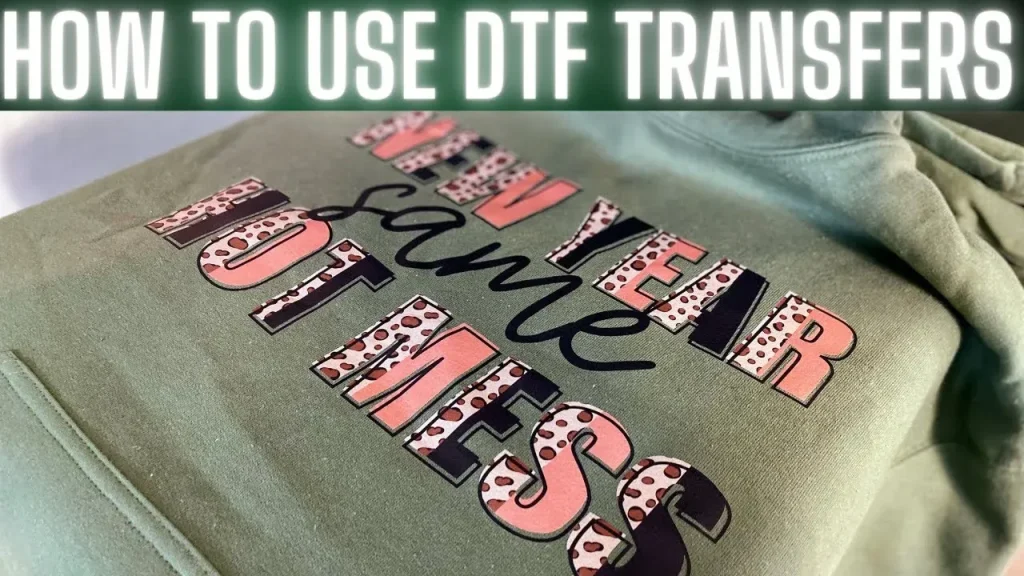
Step-by-Step Guide to Create Your Own DTF Transfers
Creating your own DTF transfers involves a straightforward step-by-step process that anyone can follow. Start with the design phase, where you will use graphic design software to create your artwork. It’s crucial to use high-resolution files and vector graphics to ensure the prints maintain their quality regardless of size changes. This will allow for sharp details and vibrant colors in the final product.
Next, the printing phase involves loading the DTF transfer film into your printer and selecting the correct settings for a reverse print. Understanding your printer’s specifications and settings will greatly impact the vibrancy of colors in your design. After printing, you’ll sprinkle the adhesive powder onto the wet ink and cure it briefly with a heat press to ensure the powder sticks properly before finally transferring it onto your fabric.
Tips for Success in DTF Printing
To achieve the best results from your DIY DTF transfers, consider implementing several tips that can enhance your overall printing experience. One crucial tip is to maintain your printer regularly, as a clean printhead will produce higher-quality prints while reducing the likelihood of ink clogs. Additionally, always conduct test prints on scrap materials before committing to your final product; this minimizes waste and allows you to adjust any settings as needed.
Proper storage of your materials is also important—keeping DTF transfer films and supplies in a cool, dry place prevents moisture from affecting the adhesive properties. Lastly, exploring different fabric options can lead to exciting discoveries about which materials work best with DTF printing, expanding your ability to create diverse and unique custom apparel.
Exploring the Benefits of DTF Transfers
The benefits of DTF transfers are plentiful, making them an attractive option for hobbyists and business owners alike. One of the main advantages is the ability to produce high-quality prints with exceptional color vibrancy and detail. DTF printing breaks traditional barriers and allows for designs that previously may have been too complex to achieve with other methods, such as screen printing.
Moreover, DTF transfers are not restricted to specific fabric types, making them versatile for a broader range of projects. Whether you are creating custom t-shirts, hoodies, or accessories, DTF printing provides flexibility and resilience. The finished product has a soft hand feel, meaning the design feels smooth against the skin, ensuring comfort while wearing the printed apparel.
Getting Started with DTF Printing for Beginners
For those new to the world of DTF printing, taking the first steps can feel overwhelming, but it doesn’t have to be. Start by familiarizing yourself with the basic equipment and materials needed. Invest in a good quality DTF printer and the appropriate film, as these will set the foundation for your printing endeavors. Online resources, including video tutorials and forums, can provide helpful insights and tips specifically catered to beginners.
Additionally, practice is key in the learning process. Start with simple designs and gradually take on more complex projects as your skills develop. Experimenting with different fabric blends and adjusting your settings will give you a deeper understanding of how to get the best results from your DTF printing. Embrace the journey, and soon you’ll be creating striking custom apparel that showcases your unique artistic style.
Frequently Asked Questions
What materials do I need for DIY DTF transfers?
To create DIY DTF transfers, you will need specific materials including a DTF printer (preferably an Epson modified for DTF use), DTF transfer film, adhesive powder, a heat press, graphic design software like Adobe Illustrator, and fabric garments made from cotton or polyester. This combination of tools and supplies will help you achieve high-quality prints.
How do I create designs for DTF printing?
To create designs for DTF printing, use graphic design software to make vector graphics that ensure quality when resized. Ensure your design elements, like colors and text, are distinct. Once your design is finalized, print it using your DTF printer, making sure to reverse the image for correct placement on fabric.
Can beginners succeed with DTF printing?
Absolutely! DTF printing is beginner-friendly with a bit of practice. Following a step-by-step process—designing your artwork, printing, applying adhesive powder, and using a heat press—can lead to stunning results. There are also numerous resources and community forums available to help beginners learn the ropes of DIY DTF transfers.
What temperature and time should I use for pressing DTF transfers?
When heat pressing DTF transfers, set your heat press to a temperature between 325°F to 350°F and press for about 15 to 20 seconds. This will ensure the adhesive bonds effectively to the fabric and that the ink adheres properly. Always allow the transfer to cool before removing the film.
How can I ensure the best results with custom apparel printing using DTF?
To achieve the best results with custom apparel printing using DTF, maintain your printer regularly, test print on scrap fabric before final applications, and experiment with different fabric types. Ensuring optimal printer settings and using high-quality materials will greatly enhance the quality of your DTF transfers.
What troubleshooting tips are there for DIY DTF transfers?
If you encounter issues with your DIY DTF transfers, such as poor adhesion or color vibrancy, check your printer settings and ensure the DTF transfer film is loaded correctly. Always test print on sample fabrics first, and adjust your heat press temperature and time if necessary. Online communities often provide additional tips and troubleshooting advice tailored to DTF printing.
| Key Points | Details |
|---|---|
| DIY DTF Transfers | A modern method for fabric printing that allows vibrant designs on various materials. |
| What is DTF Printing? | A technique where designs are printed onto film and transferred to fabric using heat. |
| Materials Needed | DTF printer, DTF transfer film, adhesive powder, heat press, graphic design software, cotton/polyester garments. |
| Step 1: Create Your Design | Use vector graphics for your designs and ensure distinct outline colors. |
| Step 2: Print the Design | Load DTF film, set appropriate printer settings, and print the design. |
| Step 3: Apply Adhesive Powder | Sprinkle powder on wet ink uniformly and cure with heat press. |
| Step 4: Transfer the Design | Use heat press to apply heat and pressure, bonding the design to the fabric. |
| Step 5: Cool and Remove the Film | Allow to cool, then peel off the transfer film and check adherence. |
| Tips for Success | Regularly maintain printers, test prints, store supplies properly, and seek resources for help. |
Summary
DIY DTF Transfers offer a fantastic opportunity to create custom designs on fabric easily and efficiently. This innovative printing technique transforms the way creators approach apparel customization, allowing for vibrant colors and high-quality results on various materials like cotton and polyester. By understanding the essential materials, following the detailed steps meticulously, and implementing best practices, anyone can achieve professional-looking transfers from the comfort of their home. Whether you’re crafting personalized gifts or launching an apparel line, mastering DIY DTF transfers will enable you to express your creativity while ensuring excellent outcomes.